| Home | Game | Rules | Theme | Strategy | FAQ |
|
|
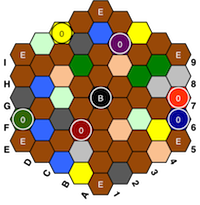
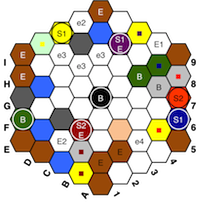
Annotated Games: 4 playersThis game was played during game testing of Explorers & Exploiters. Explorers are marked with an upper case "E" and explored tiles with a lower case "e", both followed by the number of the player exploring it (thus the only player knowing the content of the tile). Barbarians are marked with an upper case "B". Settlements are marked with an encircled "S" followed by the size number (1=Hamlet, 2=Village, 3=Town, 4="City") while settlers are marked with a square in the color of the settlement. The following color codes are used: ⬢ Grain (resource)
Start
The starting position is unknown to the players but the tiles are fairly well distributed with a potential conflict over resources between the orange and the blue settlements. 
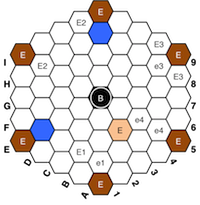
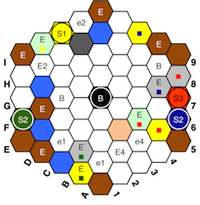
Turn 1-3
The first turns are all about exploring to find suitable tiles for exploitation. The players carve out one area each with player 1 exploring the lower left (finding 1 iron and 1 lake), player 2 exploring the upper right (finding only 1 lake), player 3 exploring the upper right (finding 1 lumber and 1 iron) and player 4 going towards the center (finding 1 grain, 1 cattle and 1 desert). Since no foundations have been found yet, no player is willing to exploit any tiles and reveal their content to the other players. 
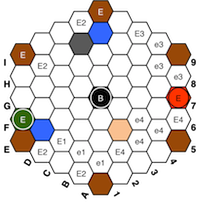
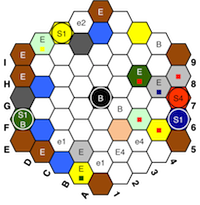
Turn 4-6
In turn 4, the first foundation is found (the green by player 1), who also exploit it with the intention to connect it to the known iron. Note that this explorer may not act again until player 1's turn so, limiting other players' opportunities to take advantage of player 1's finding. Nevertheless, player 2 hasn't yet found any valuable tiles and uses other explorers in the vicinity of the green foundation to find resources to connect with it. Player 3 explores the orange foundation and is happy to continue playing in "her" upper right corner, where she may exploit and connect both lumber and iron. Player 4 uses a new explorer to connect her explored resources with the orange foundation and happen to find the blue foundation. An interesting struggle is to be expected in that part of the board. 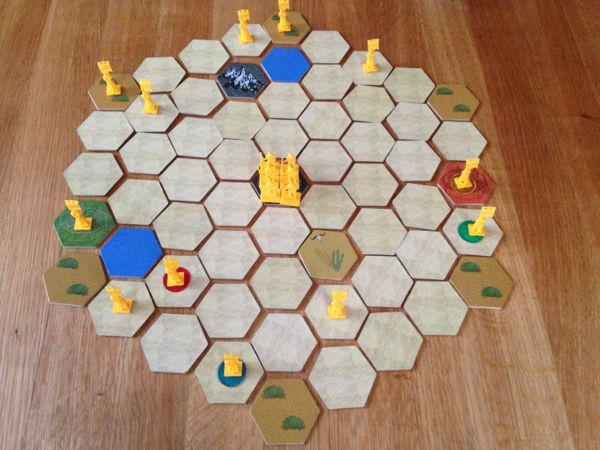
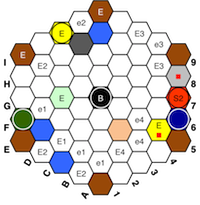
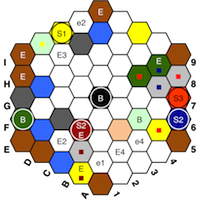
Turn 7-9
The many explorers in the lower left corner puts player 1 in a dilemma. If she exploits the wasteland in tile D2, the others will guess that she tries to connect the green foundation with the previously explored tiles B2 and C2 and exploit them before her. Instead, she gives the other the impression that there are no resources there and explores tiles above the foundation instead, eventually finding and exploiting a cattle. Player 2 on the other hand is less cautious and find a lake when trying to connect to the previously explored grain. This puts her in a similar dilemma as player 1 - two actions are necessary to connect resources but she has only time for one. She also explores other tiles instead and happens to find the yellow foundation. Player 3 and 4 are in better positions with enough foundations and found resources and now starts to exploit them. Note that player 4 takes the opportunity to build a village (2 resources) in the orange foundation rather than a hamlet (1 resource) in the blue foundation. 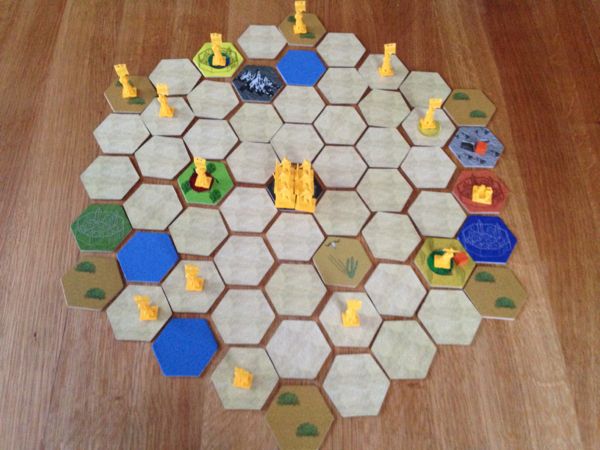
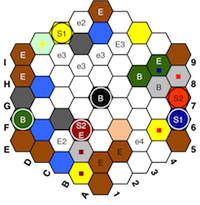
Turn 10-12
Turns 10-12 are all about expanding settlements by connecting to the resources explored and exploited previous turns. Player 3 is the most successful with 1 hamlet and 1 town played in addition to the previously played hamlet. The 12th turn also sees the first barbarian move as player 4 moves towards the city resources with the intention to expel it and play own settlements. 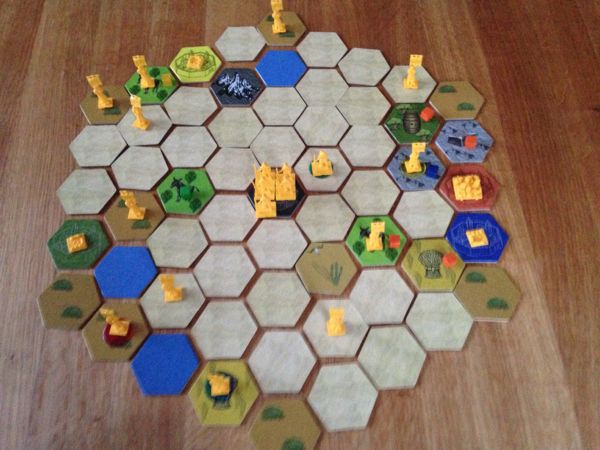
Turn 13-15
Turns 13-15 see some more tension as the barbarians enter the game. Player 2 and 4 uses them to expel settlements while player 1 and 3 continues to find expansion opportunities. Player 1 is unlucky to find a lake G4 and falls further behind while player 3 keeps the lead thanks to the exploitation of the previously explored grain at G9. The next few turns are likely to see battles. 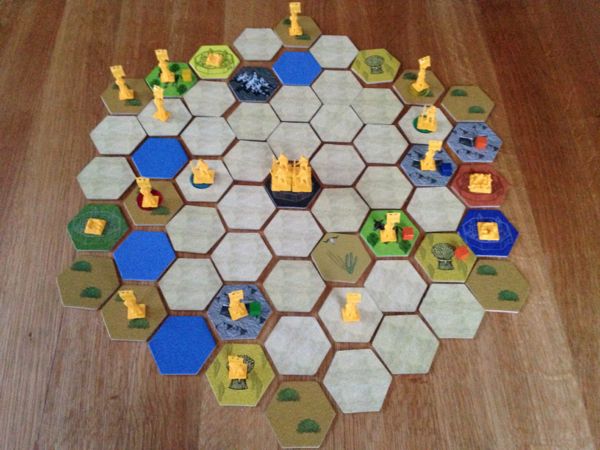
Turn 16-18
The barbarians are raging through the board. Player 2 defeats an explorer and besieges a village to be able to expel it and place a hamlet. Player 4 does likewise at the other side, where the exploiting of F9 disconnects the grain at G9 from the village at B6. Player 4 on the other hand takes advantage of the raging by exploiting new resources and re-expanding the town at C7. Player 1 struggles find new resources to connect before marching to the aid of the hamlet at F2 (or, rather, to connect the resources that will be available after an expulsion to the settlement at I7 instead) but unfortunately finds a mountain. 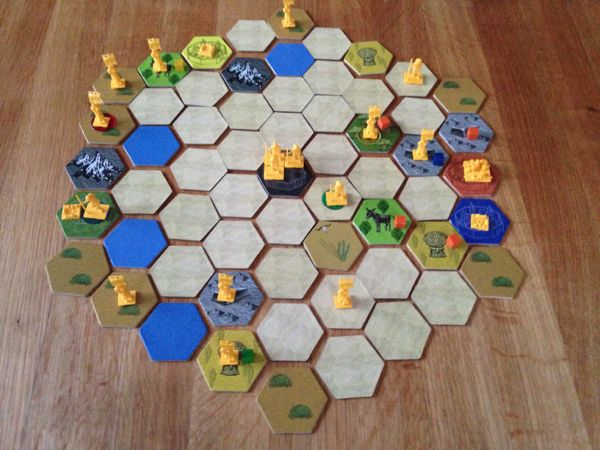
Turn 19-21
The endgame is approaching and things are getting complicated. Player 1 is fortunate to find a settlement at D3. Player 2 could have expelled the hamlet at F2 and let the newly found settlement use the grain at B1 to expand to a village but has unfortunately no villages left at hand. Instead, player 2 engages in the battle at E8 instead. As expected, player 3 abandons that part of the board to expand the village, leaving her with only a hamlet at hand, while player 4 jumps into the battle at E8, leaving the lower right to player 2. Why? Because player 2 is the only one left with the town at hand necessary to expel the city at C7. Player 3 is still in the lead but where will she find an opportunity to place the last hamlet? Player 1 remains last and her position isn't improved by exploring yet another useless mountain. 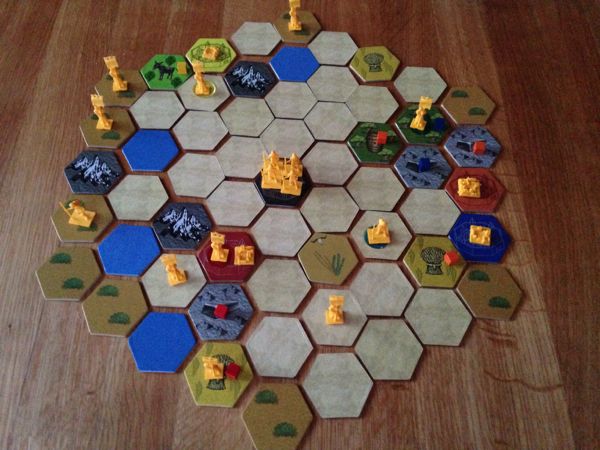
Turn 22-24
Player 3 and 4 choose different strategies for placing their last hamlets; player 3 tries to find a foundation (to expand a hamlet) while player 4 tries exploit a resource (to expel a village). Player 2, who needs to build a city, sets up a long-term plan to connect the settlement at D3 with the (hopefully) available resources on the right part of the board. Player 1 simply adopts a barbarian strategy. Player 3 succeeds in placing her second to last hamlet but player finally finds the last foundation for her last hamlet... 
Turn 25
Thanks to having found the last purple foundation, player 3 places her last hamlet and wins the game. 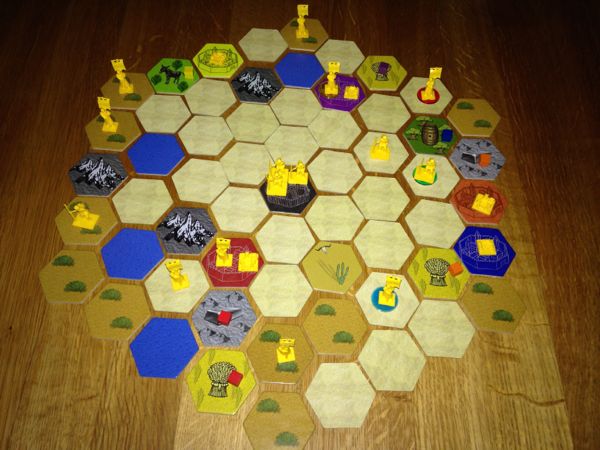
Looking back upon this very first test game, Explorers & Exploiters seems to be solid. The explorer and the barbarian actions seem fairly even and both needs to be included in a strategy. Player 3 and player 4 were lucky to find concentrated resources early but it was their use of barbarians that definitely turned the game in their favor. This was also demonstrated by player 2, whose barbarian actions helped her recover from a bad start, although it would have been more successful if it had been directed towards the richer areas of player 3 and player 4. Player 1 had a bad luck with the tiles in the middle game but the damage was already done by the too late use of barbarians. The number of units may be considered crowding the game board but serves to give the players options and the number of settlements is enough to make this game open without lasting too long. The 25 game turns last about an hour if the first 5-10 turns are played quickly. |
Annotated gamesIf you like those game mechanisms, I can also recommend:

|
||||||||||||||||||||||||||||||||||||||||||||||||||||||||||||||||||||||||||||||||||||||||||||||||||||||||||||||||||||||||||||||||||||||||||||||||||||||||||||||||||||||||||||||||||||||||||||||||||||||||||||||||||||||||||||||||||||||||||||||||||||||||||||||||||||||||||||||||||||||||||||||||||||||||||||||||||||||||||||||||||||||||||||||||||||||||||||||||||||||||||||