
| Home | Game | Rules | Theme | Strategy | FAQ |
|
|
Version History
The complete rules are available in the PDF file to the right. In the following sections, I will describe how they came to be. Implemented RulesThere are many ideas that came to live in Find the Bug!©. On this page, I would like to present some of them and explain the reasoning behind them. The game boardThe game board had to satisfy two conditions: squares in several dimensions to allow analyses from several perspectives and squares in groups to allow more than one player to test a group. Two dimensions fit the theme well (business criticality and technical complexity) and so did three times three groups (three-tier architecture). Four squares allowed most but not all players to place testers and gave a total amount of 36 squares - enough for a short game. The tasksAnalysisWithout the analysis task, the test task would simply be a random placement in search for bugs. This could still have worked with mechanisms similar to Memory but I wanted to weave in the possibility to draw conclusions about the bug probability (or bug density) in the game. First I thought of arranging piles with more or less bugs and lay them out on chess board but the setup would have been too cumbersome. Preparing bugs with more or less bugs was much quicker and the addition of a colored gem gave two clear decisions: look for a bug immediately or look at the stone first to assess the bug density. TestThe test task is basic task of the game, so basic that I first didn't consider any alternatives to simply take tiles and see if they contain bugs. However, testing is not only about knowing when to start testing but also when to stop testing. Ideally, players should place testers according to the bug density but in reality, they placed all testers at the bug dense parts and no testers anywhere else. Why? Simply because even if bugs have been found in a dense area, they were more likely to find more bugs there than in any less dense area. The option to return the first tile was a two-fold solution. The bugs in the dense areas will be quicker to find, no longer requiring all four squares to be tested, and the bugs in the less dense areas will be easier to find, making an attempt worthwhile when the other bugs have been found. This simple solution made the game much more similar to real testing! RetestThere is a balance between analysis and test as the players must decide how much to analyse before they start testing. But once they've started testing, there would be no decisions left. The retest task gave them another balance decision: is a part of the game board free from bugs or not? By introducing a retest session (with distribution of new bugs dependent on previous bugs - just like in real testing!), I gave then the decision to either continue testing or to assume that a range of squares is free from bugs and retest them all with a test tool (but risk losing the test tool if more of the old bugs remained after all). The bugsThere are a lot of calculations behind the bugs. Too few makes the game too random and too many makes the preceeding analysis redundant. Also, the choice between analysing severity of bugs (business criticality) and number of bugs (technical complexity) must be equal. Finally, there must be a spread so that each component is likely to have a unique severity or number. The current distribution is a total number of 3/6/9 bugs in the 3 modules and a total severity of 3/6/9 points in the 3 tiers. Since bugs in both modules and tiers are required to count, the expected numbers are about half: 9 bugs and 18 points. A random strategy have 36 squares to test while an analysis strategy limits the search to on average 24 squares. (In the best case, the 12 "best" squares are found and in the worst case, it finds the average squares and doesn't limit the search at all.) The possibility to return the first tile further improves the odds. The table below summarizes the expected result of the different strategies:
A player may thus choose a random strategy with more testing attempts, a low-risk analysis to find many low severity defects or a high-risk strategy to find few high severity defects. The analysis strategy pays off after 5 turns (when 5 random tiles equals 1 analysis + 4 planned tiles), although analysis is also useful to determine when a module or tier is bug free and ripe for a test tool. The possibility to adapt one's strategy to the other players' placements and the random distribution still makes each game an open affair. The reason players may return the first tile is to remove some randomness and to give some reward to analysis (as players may take 2 tiles from the bag they are most uncertain of). The task restrictionsThe tasks have some restrictions that are important for the game to flow:
|
Rules (Video)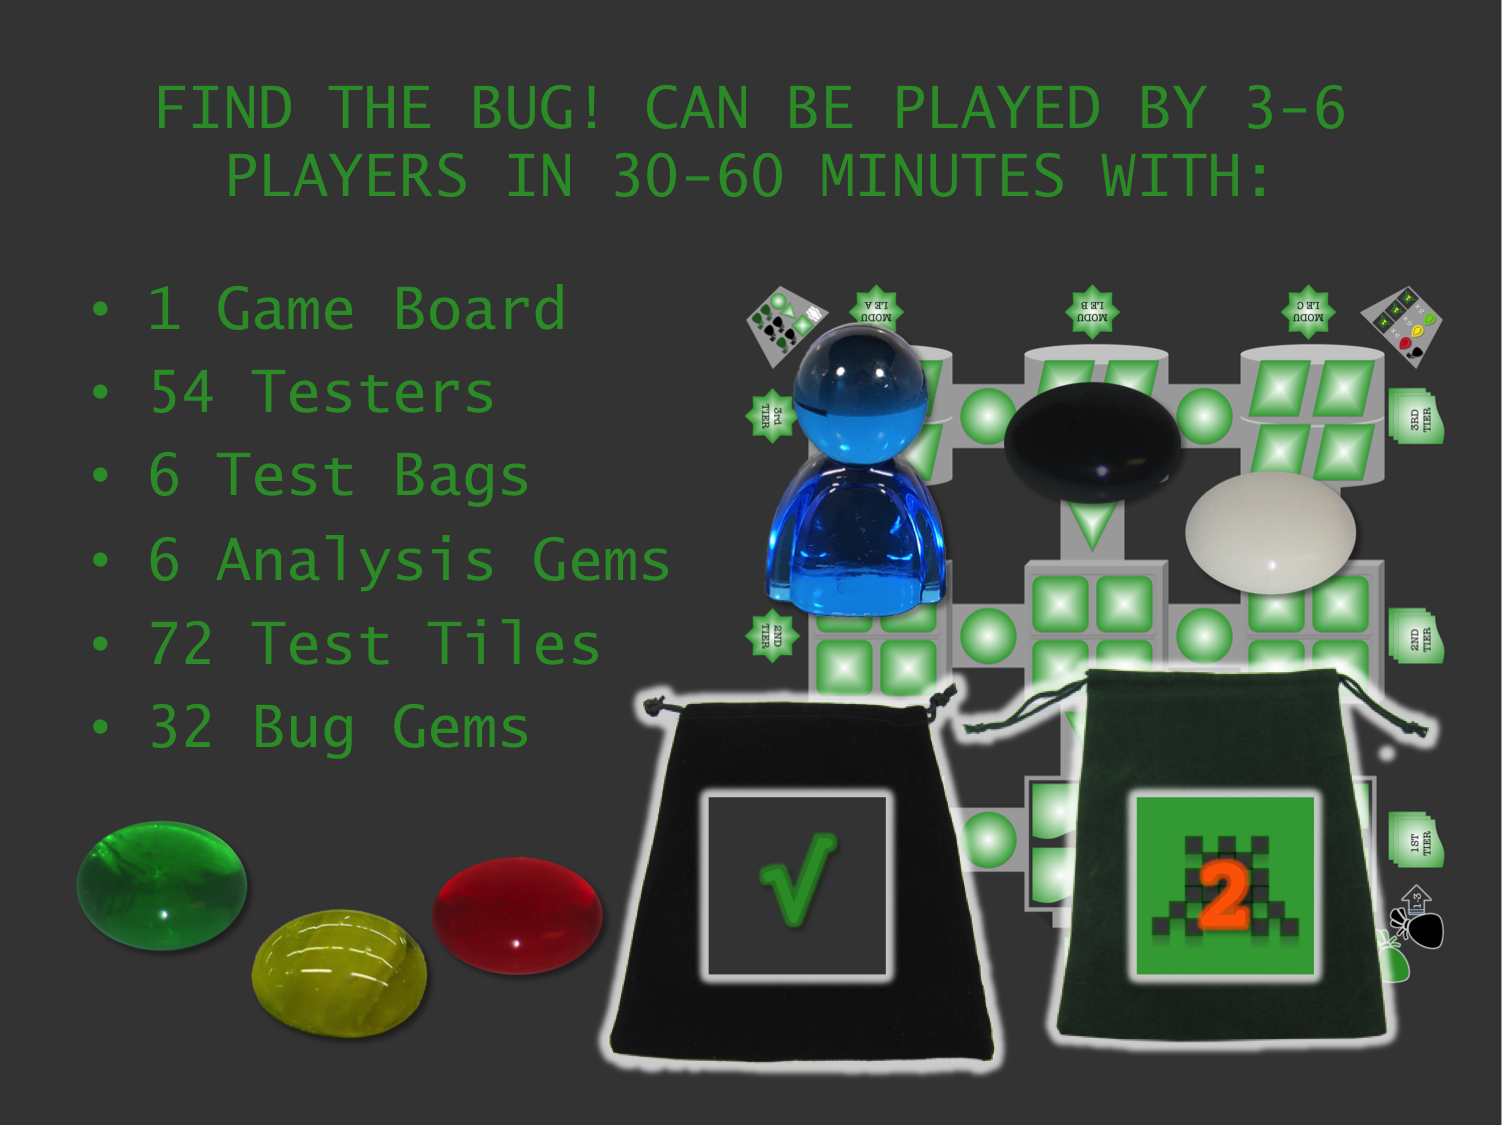
Rules (PDF)
... and Rejected RulesThere are of course also ideas that did not make it and here I explain why. Hidden test resultTo make it even more difficult for players to follow in each others' foot steps, I considered letting them hide the test result and not tell the other players whether they found a bug or not until next game turn. However, not only did I want the players to be able to use the information to some extent but this rule would also delay the building of test tools as it takes 1 more turn to assess whether a module or tier is free from bugs or not. |
|||||||||||||||||||||||||||||||||||||||||||